Tag

Kotlin

kotlin script

工程实践

kotlin是我最喜欢用的语言,语法简洁功能丰富,但是项目管理略嫌麻烦,那有什么办法可以跳过麻烦的项目管理,同时又直接使用jvm庞大生态的依赖呢

答案就是 kotlin script

使用

首先需要一个最新的idea,旧版本的idea对这类新特性的支持并不太好

kotlin脚本有好几种,临时文件里创建的scratch,gradle项目管理的build.gradle.kts,以及本文的主题 main.kts

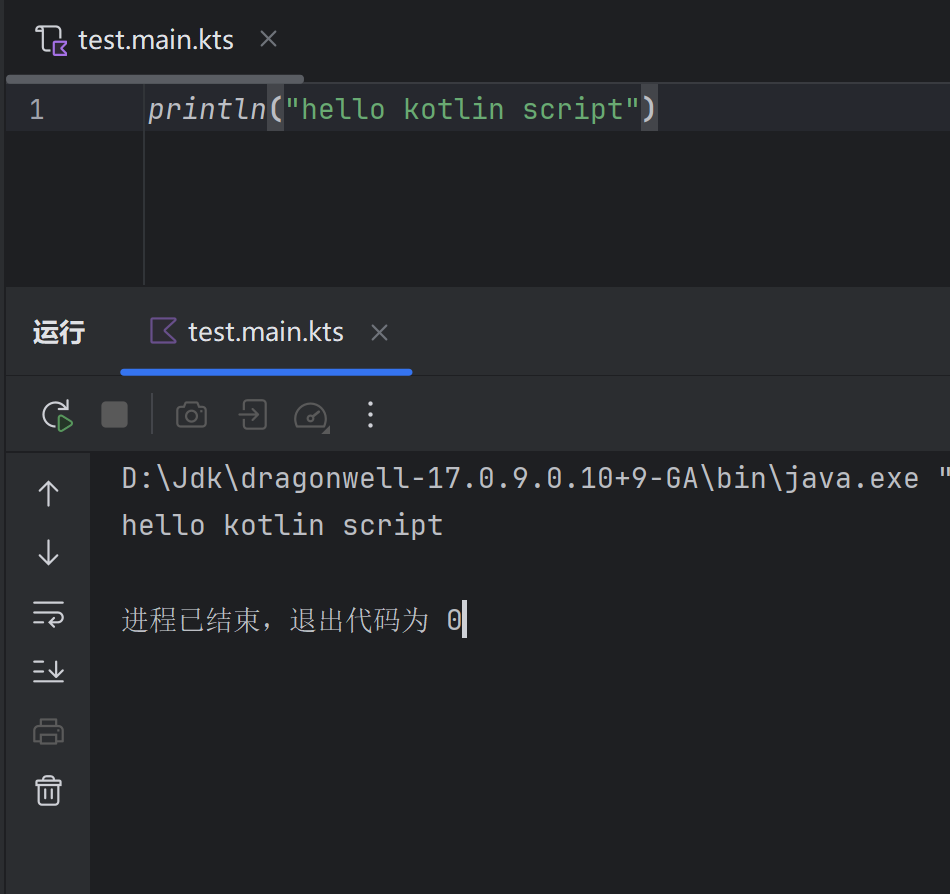
用idea在任意位置创建一个 test.main.kts ,随便写一段代码

纯文本
println("hello kotlin script")

虽然文件行号上没有任何标记,但是我们可以用 ctrl + shilt + f10 运行该文件
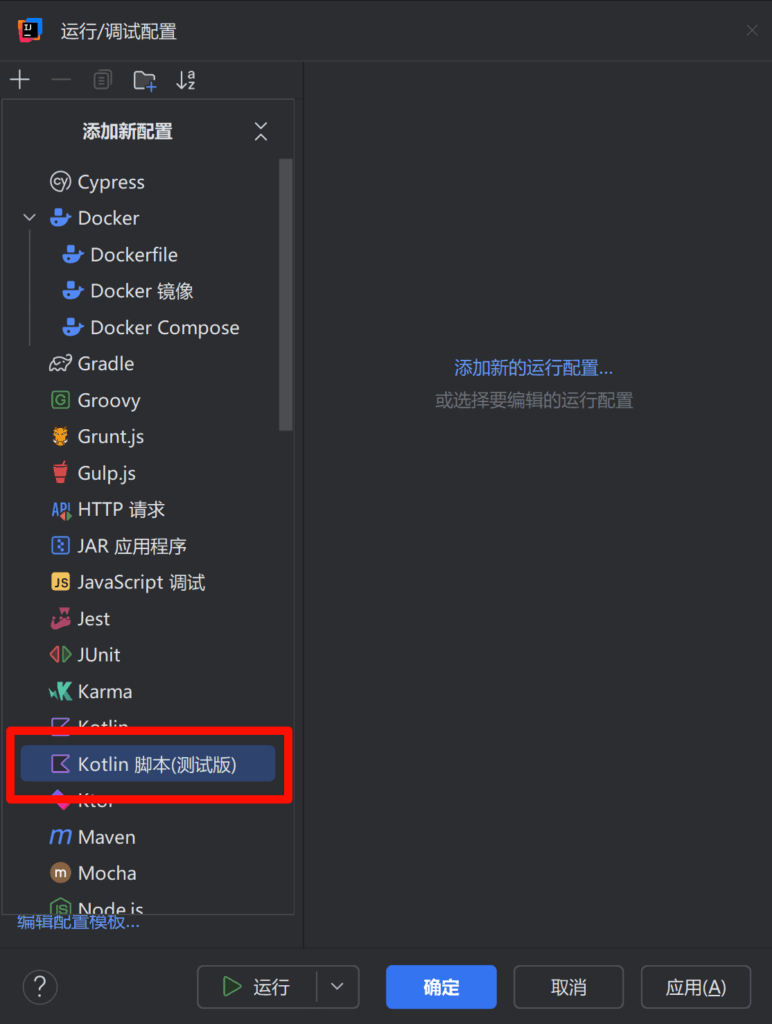
当然也可以直接新建一个运行项

引入依赖

引入依赖的方式如下 @file:DependsOn("com.google.code.gson:gson:2.11.0")

也可以用 @file:Repository("https://maven.pkg.jetbrains.space/public/p/kotlinx-html/maven") 指定maven仓库

修改代码如下,然后点一下代码编辑器右上角的加载脚本依赖项按钮

kotlin
@file:DependsOn("com.google.code.gson:gson:2.11.0")

import com.google.gson.JsonElement
import com.google.gson.JsonParser

val json: JsonElement = JsonParser.parseString("""{ "name": "kotlin script", "age": 1 }""")

println(json)

此时就已经可以使用gson的类了

当然在没有科学上网的情况下有时候是无法正常下载依赖的,对于这一点我修改了maven镜像源,以便在不开tun的情况下正常下载依赖

序列化

虽然我一直都很喜欢kotlinx.serialization的序列化,但是该序列化依赖gradle插件,我还没有研究明白怎么在 kts 脚本里使用这种插件

所以为了在脚本里使用序列化,我会选择gson作为序列化实现

提供服务

我有一些简单的http服务需要实现,这个时候我会选择ktor,他和kotlin相性极佳(毕竟都是一家的项目)

kotlin
@file:DependsOn("org.jetbrains.kotlinx:kotlinx-coroutines-core-jvm:1.10.2")

@file:DependsOn("io.ktor:ktor-server-content-negotiation:2.3.13")
@file:DependsOn("io.ktor:ktor-server-compression-jvm:2.3.13")
@file:DependsOn("io.ktor:ktor-serialization-kotlinx-json:2.3.13")
@file:DependsOn("io.ktor:ktor-server-core-jvm:2.3.13")
@file:DependsOn("io.ktor:ktor-server-netty-jvm:2.3.13")
@file:DependsOn("io.ktor:ktor-server-call-logging-jvm:2.3.13")

@file:DependsOn("com.google.code.gson:gson:2.11.0")

import com.google.gson.Gson
import com.google.gson.reflect.TypeToken
import io.ktor.http.*
import io.ktor.server.application.*
import io.ktor.server.engine.*
import io.ktor.server.netty.*
import io.ktor.server.plugins.callloging.*
import io.ktor.server.plugins.compression.*
import io.ktor.server.response.*
import io.ktor.server.routing.*
import kotlinx.coroutines.*
import org.slf4j.Logger
import org.slf4j.LoggerFactory
import org.slf4j.event.Level
import kotlin.system.exitProcess

val logger: Logger = LoggerFactory.getLogger("App")
val scope = CoroutineScope(Dispatchers.IO) + CoroutineExceptionHandler { coroutineContext, throwable ->
    logger.warn("", throwable)
}
val gson = Gson()
val json = """
    |{
    |  "kotlin": 1,
    |  "java": 2
    |}
""".trimMargin()

// 信号处理
run {
    Runtime.getRuntime().addShutdownHook(Thread {
        logger.info("exit...")
        scope.cancel()
        server.stop(0, 0)
    })
}

fun Route.configureRouting() {
    get("/{id}/status") {
        val id = call.parameters["id"]!!
        val status = gson.fromJson<Map<String, Int>>(json, object : TypeToken<Map<String, Int>>() {}.type)[id]
        call.respondText(status.toString())
    }
}

// http服务
val server = embeddedServer(Netty, 5753) {
    install(CallLogging) {
        level = Level.INFO
    }
    install(Compression) {
        gzip {
            priority = 1.0
            matchContentType(ContentType.Text.Any)
        }
        deflate {
            priority = 10.0
            minimumSize(1024)
        }
    }
    routing {
        configureRouting()
    }
}
server.start(true)
exitProcess(0)

部署

在idea里面我们已经可以运行main.kts脚本了,但是如果要部署,那怎么办呢

这儿需要到 kotlinrelease 下载 kotlin-compiler

纯文本
#!/bin/bash

kotlinc/bin/kotlin -Dfile.encoding=utf8 your_file.main.kts

然而添加jvm参数的部分在win上用不了,虽然我提了issue但是并没有解决

优势

很多时候我会写很多测试代码,调研某个库的使用方法和功能实现,但是这些代码如果集中在一个项目,会让项目变得很大,加载很慢,如果分开会不方便统一管理

这个时候使用kotlin script就可以很方便的管理

小问题

当我有如下代码

kotlin
@file:DependsOn("com.google.code.gson:gson:2.11.0")

import com.google.gson.JsonElement
import com.google.gson.JsonParser

val json: JsonElement = JsonParser.parseString("""{ "name": "kotlin script", "age": 1 }""")

object MyService {
    fun someFunction(): String {
        return json.toString()
    }
}

println(MyService.someFunction())

那么运行之后会出现

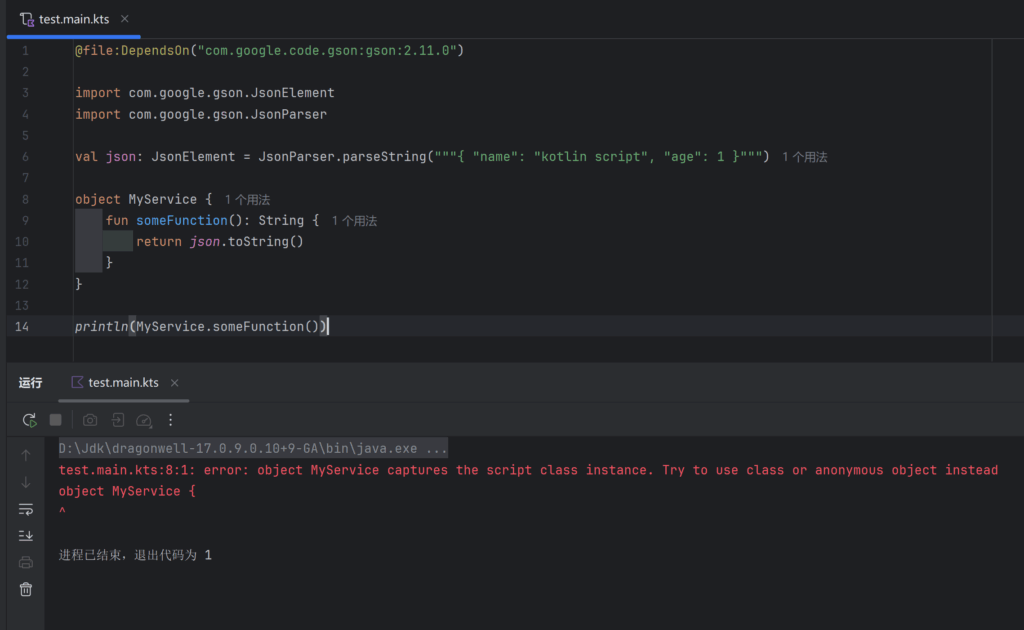
虽然这是合理的是可能的,但是这是合理的是不太可能的

另外idea在重载kts脚本依赖的时候会阻塞ui线程导致idea无响应

再另外,对于低版本的idea使用kts脚本引用外部依赖,会在打开反编译代码的时候放一个索引按钮,但是点了压根没用(新版本修了

总结

对于一些简单项目,使用 kotlin script非常爽,不管是修改还是部署,都很方便

总之好用爱用多用😋

kotlin notebook 使用体验

工程实践

最近遇到一些数据分析的需求,正好之前看到又新又好的[kotlin notebook](https://book.kotlincn.net/text/d-notebook-get-started.html),就拿来玩了一下

前置条件

首先按照教程,需要安装插件,此处由于公司电脑的idea版本较旧(不是不想更,是更新了jrebel启动慢一倍),所以一开始新建了文件也没有代码高亮,最终装个两个版本的idea,旧版本idea专门跑jrebel项目

然后按照教程需要一个项目,此处测试了项目类型,intellij和gradle都是可以的

使用

在项目文件夹内任意位置新建一个kotlin notebook文件,即可使用

引入依赖

纯文本
// 使用最新版本的依赖
%useLatestDescriptors

// 引入 Kotlin DataFrame 依赖
%use dataframe

// 引入 Gson 依赖 (引入方式和 main.kts 一样)
@file:DependsOn("com.google.code.gson:gson:2.11.0")

高亮

在运行notebook中的代码之后,关闭项目并重新打开,会发现代码高亮没了,此时需要重新完整运行notebook的代码,才能重置高亮(另外代码块不支持折叠很坏

小问题

可以在块1定义class块2引用,但是直接在块2引用块1定义的变量,代码高亮会出现错误

总结

虽然体验上任有改进空间,但是实际使用是没有大问题的,好用爱用多用😋

gradle打包依赖进jar

开发工具
kotlin
tasks.create<Jar>("fatJar") {
    archiveBaseName.set(project.name + "-all")
    duplicatesStrategy = DuplicatesStrategy.EXCLUDE
    manifest {
        attributes["Main-Class"] = "top.e404.bot.loader.Main"
    }
    val exclude = listOf(
        "LICENSE.txt",
        "META-INF/MANIFSET.MF",
        "META-INF/maven/**",
        "META-INF/*.RSA",
        "META-INF/*.SF"
    )
    val dependencies = configurations.runtimeClasspath.get().map(::zipTree)
    from(dependencies).exclude {
        it.path in exclude
    }
    with(tasks.jar.get())
}

或者使用 shadow 插件

kotlin
import org.jetbrains.kotlin.gradle.tasks.KotlinCompile

plugins {
  kotlin("jvm") version "1.7.21"
  id("com.github.johnrengelman.shadow") version "7.1.2"
}

group = "top.e404"
version = "1.0.0"

repositories {}

dependencies {}

tasks.shadowJar {
  archiveFileName.set("${project.name}-${project.version}-all.jar")
}

UTC时间转北京时间

编程笔记
kotlin
fun main() {
    val formatPattern = "yyyy-MM-dd HH:mm:ss"
    val utc = "2019-07-10T16:00:00.000Z"
    val time = parse(utc, formatPattern)
    println(time)
}

fun parse(utc: String, formatPattern: String): String {
    val zdt = ZonedDateTime.parse(utc)
    val ldt = zdt.toLocalDateTime()
    val formatter = DateTimeFormatter.ofPattern(formatPattern)
    return formatter.format(ldt.plusHours(8))
}

参考 https://www.jianshu.com/p/62fa934ad2bc

使用Gson序列化和反序列化

编程笔记

引入依赖

Gradle

纯文本
implementation 'com.google.code.gson:gson:2.8.8'

Maven

xml
<dependency>
    <groupId>com.google.code.gson</groupId>
    <artifactId>gson</artifactId>
    <version>2.8.8</version>
</dependency>

示例代码

java
package com.e404.test

import com.google.gson.Gson
import com.google.gson.GsonBuilder
import java.io.FileInputStream
import java.io.FileOutputStream

fun main() {
    // 反序列化
    val stu: Student = FileInputStream("in.json").use {
        it.bufferedReader().use { br ->
            Gson().fromJson(br, Student::class.java)
        }
    }
    println("stu.name: ${stu.name}")
    println("stu.age: ${stu.age}")
    // 序列化
    FileOutputStream("out.json").use {
        it.bufferedWriter().use { bw ->
            // 要写入的json字符串
            // setPrettyPrinting 是生成带缩进的字符串
            val str: String = GsonBuilder().setPrettyPrinting().create().toJson(stu)
            bw.write(str)
        }
    }
}

/**
 * 必须要有无参的构造方法和每个参数的getter和setter
 *
 * (idea下setter可以用alt+insert快速生成)
 *
 * 否则会报错
 */
class Student(var name: String = "", var age: Int = 0)

使用SnakeYaml序列化和反序列化

编程笔记

SnakeYaml官网:http://www.snakeyaml.org/

引入依赖

Gradle

纯文本
implementation 'org.yaml:snakeyaml:1.29'

Maven

xml
<dependency>
    <groupId>org.yaml</groupId>
    <artifactId>snakeyaml</artifactId>
    <version>1.29</version>
</dependency>

使用示例

java
package com.e404.test

import org.yaml.snakeyaml.DumperOptions
import org.yaml.snakeyaml.Yaml
import org.yaml.snakeyaml.nodes.Tag
import java.io.FileInputStream
import java.io.FileOutputStream

fun main() {
    // 反序列化
    val stu: Student = FileInputStream("in.yml").use {
        Yaml().loadAs(it, Student::class.java)
    }
    println("stu.name: ${stu.name}")
    println("stu.age: ${stu.age}")
    // 序列化
    FileOutputStream("out.yml").use {
        it.bufferedWriter().use { bw ->
            // 字符串 (使用dumpAs以移除bean标签)
            val str: String = Yaml().dumpAs(stu, Tag.MAP, DumperOptions.FlowStyle.BLOCK)
            bw.write(str)
        }
    }
}

/**
 * 必须要有无参的构造方法和每个参数的getter和setter
 *
 * (idea下setter可以用alt+insert快速生成)
 *
 * 否则会报错
 */
class Student(var name: String = "", var age: Int = 0)

使用zxing生成&识别二维码

编程笔记

GitHub

zxing/zxing

引入依赖

Gradle

纯文本
implementation 'com.google.zxing:core:3.4.1'

Maven

xml
<dependency>
    <groupId>com.google.zxing</groupId>
    <artifactId>core</artifactId>
    <version>3.4.1</version>
</dependency>

示例代码

kotlin
import com.google.zxing.*
import com.google.zxing.common.HybridBinarizer
import com.google.zxing.qrcode.decoder.ErrorCorrectionLevel
import java.awt.geom.AffineTransform
import java.awt.image.BufferedImage


object QrUtil {
    private val mfw = MultiFormatWriter()
    private val encodeHints = object : HashMap<EncodeHintType, Any>() {
        init {
            put(EncodeHintType.ERROR_CORRECTION, ErrorCorrectionLevel.H)
            put(EncodeHintType.CHARACTER_SET, Charsets.UTF_8)
            put(EncodeHintType.MARGIN, 1)
        }
    }
    
    private val decodeHints = object : HashMap<DecodeHintType, Any>() {
        init {
            put(DecodeHintType.CHARACTER_SET, Charsets.UTF_8)
            //优化精度
            put(DecodeHintType.TRY_HARDER, true)
            //复杂模式,开启PURE_BARCODE模式
            put(DecodeHintType.PURE_BARCODE, true)
        }
    }

    /**
     * 生成二维码
     *
     * 若宽/高小于生成的二维码的最小宽度则会忽略此宽/高度, 否则会生成此宽/高度的二维码图片
     *
     * @param content 正文
     * @param width 目标图片宽度
     * @param height 目标图片高度
     * @param color1 二维码颜色
     * @param color2 二维码背景
     * @return 二维码图片
     */
    @Throws(WriterException::class)
    fun getQrImage(
        content: String,
        width: Int,
        height: Int,
        color1: Int,
        color2: Int,
    ): BufferedImage {
        val bitMatrix = mfw.encode(content, BarcodeFormat.QR_CODE, width, height, encodeHints)
        val w = bitMatrix.width
        val h = bitMatrix.height
        val image = BufferedImage(w, h, 1)
        for (x in 0 until w) for (y in 0 until h) image.setRGB(x, y, if (bitMatrix[x, y]) color1 else color2)
        return image
    }

    /**
     * 识别二维码
     *
     * @param image 要识别的图片
     * @return 识别的结果
     */
    @Throws(NotFoundException::class)
    fun decode(image: BufferedImage): String {
        val source = BufferedImageLuminanceSource(image)
        val bitmap = BinaryBitmap(HybridBinarizer(source))
        return MultiFormatReader().decode(bitmap, decodeHints).text
    }

    class BufferedImageLuminanceSource(
        image: BufferedImage,
        left: Int = 0,
        top: Int = 0,
        width: Int = image.width,
        height: Int = image.height,
    ) :
        LuminanceSource(width, height) {
        private val image: BufferedImage
        private val left: Int
        private val top: Int
        override fun getRow(y: Int, rowBytes: ByteArray): ByteArray {
            var row = rowBytes
            require(!(y < 0 || y >= height)) { "Requested row is outside the image: $y" }
            if (row.size < width) row = ByteArray(width)
            image.raster.getDataElements(left, top + y, width, 1, row)
            return row
        }

        override fun getMatrix(): ByteArray {
            val width = width
            val height = height
            val area = width * height
            val matrix = ByteArray(area)
            image.raster.getDataElements(left, top, width, height, matrix)
            return matrix
        }

        override fun isCropSupported() = true
        override fun crop(left: Int, top: Int, width: Int, height: Int) =
            BufferedImageLuminanceSource(image, this.left + left, this.top + top, width, height)

        override fun isRotateSupported() = true

        override fun rotateCounterClockwise(): LuminanceSource {
            val sourceWidth = image.width
            val sourceHeight = image.height
            val transform = AffineTransform(0.0, -1.0, 1.0, 0.0, 0.0, sourceWidth.toDouble())
            val rotatedImage = BufferedImage(sourceHeight, sourceWidth, BufferedImage.TYPE_BYTE_GRAY)
            val g = rotatedImage.createGraphics()
            g.drawImage(image, transform, null)
            g.dispose()
            val width = width
            return BufferedImageLuminanceSource(rotatedImage, top, sourceWidth - (left + width), height, width)
        }

        init {
            val sourceWidth = image.width
            val sourceHeight = image.height
            require(!(left + width > sourceWidth || top + height > sourceHeight)) { "Crop rectangle does not fit within image data." }
            for (y in top until top + height) {
                for (x in left until left + width) {
                    if (image.getRGB(x, y) and -0x1000000 == 0) {
                        image.setRGB(x, y, -0x1) // = white
                    }
                }
            }
            this.image = BufferedImage(sourceWidth, sourceHeight, BufferedImage.TYPE_BYTE_GRAY)
            this.image.graphics.drawImage(image, 0, 0, null)
            this.left = left
            this.top = top
        }
    }
}

Java中获取到的颜色是负数

编程笔记

这几天写图片处理相关的代码的时候遇到个问题,BufferedImage.getRGB()的返回值有时会是负数

百度一番之后找到了原因:

颜色的取值范围0x00000000-0xffffffff,会超过int类型的最大值

为了能让其正常取值,超过int最大值的会变成 他本身 - 1 - 0xffffffff

这里我写了一段转化的代码供参考

kotlin
/**
 * 处理颜色补码(- -> +)
 * 将可能为负的颜色转成正数的Long
 *
 * @param color 可能为负数的颜色
 * @return 经过转换的颜色
 */
fun fromRgb(color: Int): Long {
    return (if (color < 0) 0xffffffff + color + 1 else color).toLong()
}

/**
 * 处理颜色补码(+ -> -)
 * 将长度超过Int的颜色转成可能为负的Int颜色
 *
 * @param color 正数颜色, Long
 * @return 经过转换的颜色
 */
fun toRgb(color: Long): Int {
    return (if (color > Int.MAX_VALUE) (color - 1 - 0xffffffff) else color).toInt()
}